over-engineering my home router on a bananapi bpi-r3
split DoH, P2P DNS roots, legacy 802.11b CCK rates for retro consoles, and putting an unallocated 6.5GB eMMC partition to work without eating flash.
Most home network setups fall into one of two traps: either you run whatever ISP gateway came in the box and pretend bufferbloat and plaintext DNS aren’t happening, or you stick a loud, power-hungry x86 1U box in a closet just to route packets.
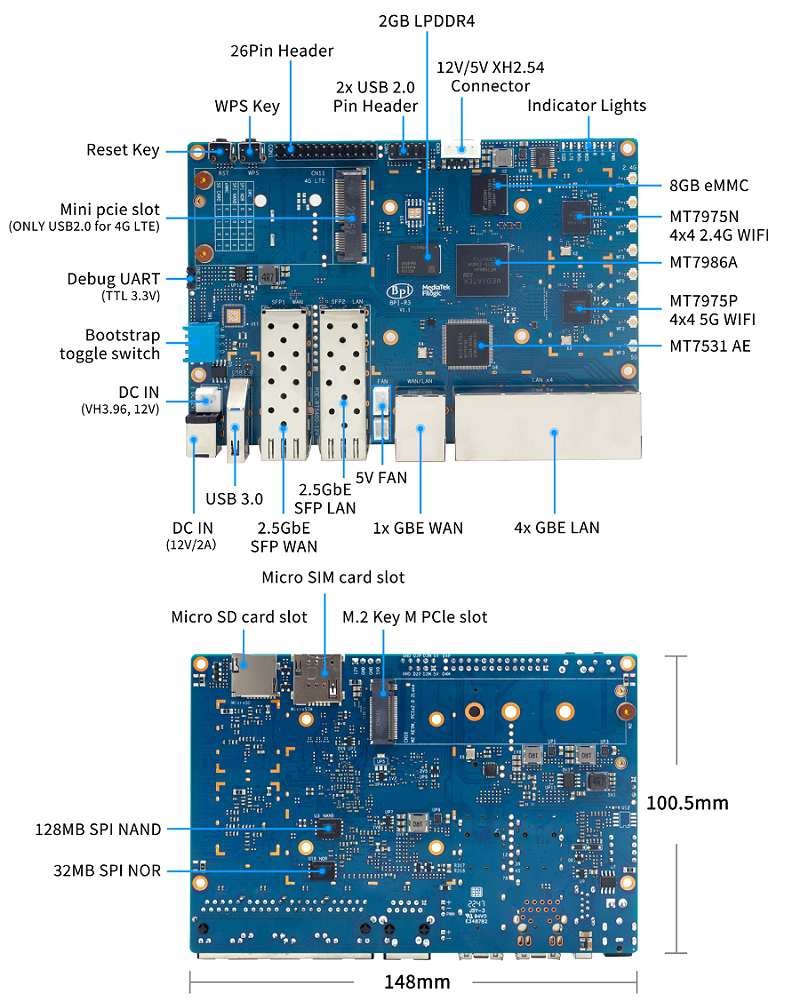
I run a Banana Pi BPI-R3 on OpenWrt 24.10. Under the hood, it pairs a MediaTek MT7986A (Filogic 830, quad-core Cortex-A53 up to 2.0 GHz, 18,000 DMIPs) with an MT7531 7-port GbE switch, 2GB DDR4, dual MT7975 Wi-Fi 6 front-ends (4x4 2.4 GHz MT7975N + 4x4 5 GHz MT7975P), 128MB onboard SPI-NAND, and an 8GB eMMC. It has two 2.5GbE SFP cages (fixed 2.5GBASE-X serdes), 5 gigabit RJ45 ports, hardware Wi-Fi 6 offloading via MediaTek’s Wireless Ethernet Dispatch (WED), and a 3-pin PWM fan on the heatsink. It chews through multi-gigabit routing without breaking a sweat — though as covered in Section 8, getting that fan to actually behave took some doing.
Getting an OpenWrt box dialed in to do everything you want—privacy, isolating untrusted hardware, retro device compatibility, decentralized naming, and local telemetry—without bricking performance or wearing out your flash is an interesting exercise.
Here is how my network is laid out, the eMMC flash architecture realities on the BPI-R3, and the non-obvious problems solved along the way.
1. The BPI-R3 eMMC Flash Architecture & The Missing 6.5GB
The Banana Pi BPI-R3 has multi-boot hardware strapping via a 4-pin DIP switch block (SW1, SW2, SW5, SW6) supporting SPI-NOR (000x), SPI-NAND (101x), microSD (11x1), and eMMC (0110). Because microSD and eMMC share bus pins, they cannot be accessed simultaneously. On a standard OpenWrt eMMC install, the board boots ARM Trusted Firmware (BL2 BL31 BL33/U-Boot, all packaged together inside a single FIP container), then U-Boot loads the OpenWrt FIT image from the production partition.
One critical hardware detail on the SFP ports: the SerDes lines on the R3 are fixed to 2.5GBASE-X. They do not support 1000BASE-X auto-negotiation or insertion detection interrupts, so using SFP copper/optical modules requires modules that natively talk 2.5GBASE-X — Banana Pi’s own tested list includes SFP-2.5G-T-R-RM (copper), SFP-2.5G-BX0-U/SFP-2.5G-BX0-D (optical), and TP-Link’s TL-SM410U / TL-SM411LSA.
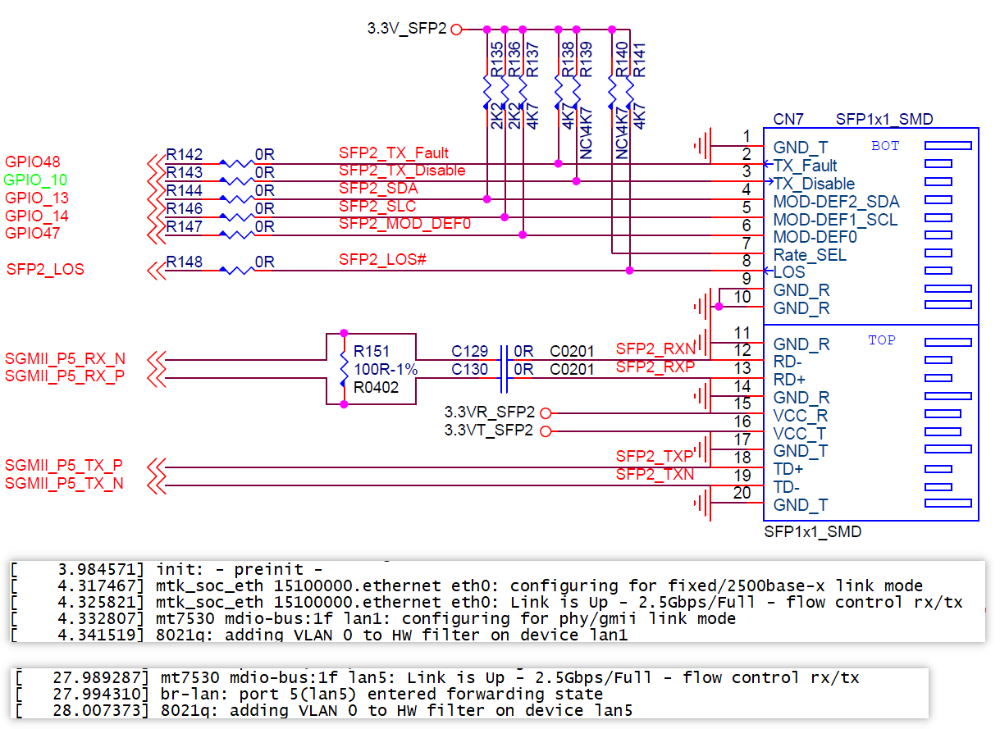
If you inspect the GPT partition table on the internal 8GB eMMC (/dev/mmcblk0), you’ll notice something odd about how OpenWrt provisions storage by default:
Number  Start   End     Size    File system  Name        Flags
128     17.4kB  4194kB  4177kB                           bios_grub
 1      4194kB  4719kB  524kB                ubootenv    hidden, legacy_boot
 2      4719kB  6816kB  2097kB               factory     hidden
 3      6816kB  12.6MB  5767kB               fip         boot, hidden, esp
 4      12.6MB  67.1MB  54.5MB               recovery    boot, hidden, esp
 5      67.1MB  805MB   738MB                production
 6      805MB   7818MB  7013MB  f2fs         f2fs
Standard OpenWrt images flash a fixed ~104MB to ~738MB production partition (p5), which mounts the read-only SquashFS kernel/rootfs (/rom) and uses the trailing space for an F2FS overlay (/overlay). Because the stock GPT is conservative, over 6.5 GB of the 8GB eMMC is left unallocated trailing space.
The official OpenWrt wiki suggestion is:
- Boot from SPI-NAND via DIP switches (
A=1, B=0, C=1, D=0). - Run
parted /dev/mmcblk0 resizepart 5 100%. - Boot into failsafe mode to run
resize.f2fs /dev/mmcblk0p5so/overlayabsorbs the entire 7GB+.
I created a distinct GPT partition (p6, f2fs) separate from production, auto-mounted at /mnt/data via fstab.@mount[0] (matched by UUID). Rather than following the wiki’s advice to grow /overlay into a single monolithic 7GB+ root partition — which makes factory resets, sysupgrades, and filesystem checks messier — this keeps the split: a small, stable production/overlay for the OS, and a clean separate F2FS partition for data that doesn’t need to survive a factory reset the same way.
The Kioxia eMMC Wear Catch
Before turning /mnt/data into a logging dumping ground, checking the hardware health via sysfs revealed an interesting contradiction:
# cat /sys/block/mmcblk0/device/life_time
0x0b 0x00

# cat /sys/block/mmcblk0/device/pre_eol_info
0x01
In JEDEC eMMC 5.x health reporting:
life_time: byte 1 is device type A (SLC), byte 2 is device type B (MLC/TLC).0x0btranslates to “exceeded its maximum estimated device lifetime”.pre_eol_info:0x01means “Normal”, with reserve blocks intact.
Kioxia soldered eMMC chips (008GB0) — whether 0x0b here reflects genuine wear or a manufacturer quirk in how this chip populates the field is unclear to me. But contradictory health reporting on boot media is a clear warning: do not dump unbuffered, hot telemetry on flash.
2. Putting /mnt/data to Work Without Flash Thrashing
Here is how /mnt/data was configured to maximize utility while minimizing write amplification:
A. Persistent banIP Feeds in Flash (~860 KB)
By default, banip pulls threat intelligence blocklists (Hagezi, URLhaus, Feodo, emerging threats) directly into /tmp (RAM). On every reboot, tens of megabytes of IP blocklists are re-downloaded over WAN and re-parsed.
- Set
ban_basedir='/mnt/data/banip',ban_backupdir='/mnt/data/banip/backup', andban_backup='1'. - Feeds are cached on flash as compact gzip files (~860 KB total).
- On boot or reload, nftables sets are reconstituted immediately from flash without waiting for network fetches or thrashing RAM.
B. Persistent Syslog & The copytruncate Gotcha
OpenWrt defaults to an in-memory 128 KB circular log buffer (logread). If an interface bounces or the router reboots unexpectedly at night, the log buffer is wiped clean.
- Configured
system.@system[0].log_file='/mnt/data/log/messages'. - Installed
logrotatewith daily rotations, capped at 20MB, retaining 7 compressed copies. - The Gotcha: OpenWrt’s
logread -f -Fdaemon holds an open file descriptor on the log path. If logrotate performs a standardrename+create,logreadcontinues spewing bytes into the unlinked file handle, leaking disk space. Specifyingcopytruncatein/etc/logrotate.confis mandatory. - Audit your background noise generators: I deliberately run noisy (a Python script that crawls random DNS/HTTP links in the background to pollute ISP tracking profiles with synthetic junk traffic) as a procd daemon (
S99noisy, with an hourly respawn so memory leaks stay bounded). However, by default,noisyran with--log info, printing anINFO:root:Visiting <url>line every 8–22 seconds. That generates ~6,000 to ~9,000 lines of log spam a day. Writing that straight to flash would have thrashed the eMMC and ironically preserved an unencrypted URL audit trail of synthetic browsing right on disk. Dropping its service argument to--log warningkeeps the obfuscation running silently without polluting the syslog or eating flash write cycles.
C. Traffic Accounting Without Surveillance (vnStat vs. nlbwmon)
I wanted visibility into interface throughput and ISP data caps without creating a creepy surveillance ledger of what everyone on the network was doing.
- Avoided
nlbwmon: nlbwmon tracks per-LAN-device protocol and bandwidth consumption, building a behavioral profile of every host. - Deployed
vnstat2: vnStat reads interface byte counters from the kernel. PointedDatabaseDirto/mnt/data/vnstat/vnstat.db, sampled every 10 minutes onbr-wanonly. Zero destination tracking, zero packet inspection, zero privacy footprint.
D. Automated Weekly sysupgrade Backups
Added a Sunday 4:30 AM cron job running /usr/bin/backup-config.sh:
sysupgrade -b /mnt/data/backups/openwrt/config-$(date +%Y-%m-%d-%H%M).tar.gzThe script generates a chmod 600 backup archive and package inventory, retaining 30 days of snapshots pruned via find -exec rm -f (busybox find lacks -delete).
3. Split DNS: Filtered DoH vs. Untrusted Guest Isolation
One global DNS upstream never works if you run isolated VLANs.
On my primary LAN (tsukimi), I want encrypted DNS-over-HTTPS (DoH) with ad/tracker blocking. On the guest/untrusted network (Linksys_084F — placeholder SSID, 192.168.67.0/24), I want strict isolation from my LAN, and I want fast, generic resolution via public upstreams (1.1.1.1 and 8.8.8.8) without touching my private filtered DoH stack or relying on ISP-provided DNS.
A single dnsmasq process cannot bind different upstreams to different interfaces. The solution is running two distinct dnsmasq instances in UCI:
dnsmasq.main: bound tobr-lan,loopback, andwg0. Forwards to three localhttps-dns-proxyinstances (127.0.0.1:5053–5055) rotating between AdGuard, Mullvad, and Quad9.dnsmasq.guest: bound strictly tobr-private. Configured withnoresolv='1'and explicit static upstreams1.1.1.1and8.8.8.8.
[LAN & WireGuard Clients] ──> dnsmasq.main (192.168.1.1:53)  ──> https-dns-proxy (DoH) + Alfis + meshnamed
[Guest / IoT Clients]     ──> dnsmasq.guest (192.168.67.1:53) ──> 1.1.1.1 / 8.8.8.8
The guest firewall zone has input=REJECT, with pinhole rules allowing only DHCP (UDP 67–68) and DNS (UDP/TCP 53). Guest devices cannot probe LuCI, SSH, WireGuard, or any LAN device.
4. Alternative Roots & The Yggdrasil Mesh Overlay
ICANN shouldn’t be the only root that exists on a home gateway, and clearnet IPv4/IPv6 transit shouldn’t be the only way devices can communicate end-to-end.
Native Yggdrasil with Routed LAN Subnets
I run Yggdrasil directly on the BPI-R3 via OpenWrt’s native proto=yggdrasil netifd module (network.ygg).
Instead of running an overlay client on every phone, laptop, or server in the house:
- The router holds its own cryptographically derived Yggdrasil node address on the point-to-point
ygginterface (200:.../7). - The router’s routed subnet (
300:64df:142a:1b81::/64) is bound directly to the primary bridge (br-lan). odhcpdadvertises this/64prefix via Router Advertisements (RA) alongside standard clearnet IPv6.
Every client on the home Wi-Fi and LAN automatically receives an end-to-end routable Yggdrasil IPv6 address out of the 300::/64 prefix without installing Yggdrasil or needing root privileges. The router transparently routes traffic bound for 200::/7 out the ygg interface.
For peering, I run yggdrasil-jumper (/usr/sbin/yggdrasil-jumper) as a companion daemon. Jumper connects to Yggdrasil’s local admin socket (/tmp/yggdrasil/ygg.sock), probes public peers over WAN, and continuously benchmarks latencies to dynamically add, prune, and re-order peer links.
Firewall Zone Integration
From a security perspective, ygg is grouped inside the wan firewall zone (firewall.@zone[1].network='wan' 'wan6' 'ygg'). This means:
- Outbound connections from LAN devices into the global Yggdrasil mesh are fully permitted and routed.
- Inbound unsolicited connections arriving from other Yggdrasil nodes hit the standard WAN default drop/reject policy. The home network isn’t left wide open to the mesh.
Decentralized Resolution: Alfis & Meshnamed
Alongside clearnet DoH, dnsmasq.main selectively forwards decentralized domain hierarchies to lightweight local daemons:
- Alfis (
127.0.0.1:5354): handles alternative and blockchain domains (.anonym,.anon,.lib,.fur,.emc,.coin,.bazar). - meshnamed (
127.0.0.1:5355): handles deterministic base32/IPv6 resolution for Yggdrasil and CJDNS mesh networks (.meshname,.meship,.popura,.cjd).
# /etc/config/dhcp
list server '/anonym/127.0.0.1#5354'
list server '/lib/127.0.0.1#5354'
list server '/meshname/127.0.0.1#5355'
list server '/cjd/127.0.0.1#5355'
Queries are routed deterministically: clearnet stays on filtered DoH, mesh/crypto domains resolve locally without query leakage, and clients configure zero custom resolver software. Any device on the home network can type a .meshname or .lib domain into a browser and have it resolve and route cleanly.
5. Retro Wi-Fi: Why 802.11b Handhelds Can’t See Modern APs
If you try connecting a Sony PSP-1000 or Nintendo DS to a modern 2.4 GHz network, you’ll often encounter a strange bug: even with open or WPA-AES security, the console will not even show the SSID in the scan list.
It’s not an authentication error—the console physically cannot decode the beacon.
Modern hostapd defaults on hw_mode=g advertise basic rates (the mandatory modulation rates that beacon frames and management frames must use) strictly via OFDM (6, 12, 24 Mbps). An 802.11b-only device lacks the hardware to demodulate OFDM; it requires legacy DSSS / CCK modulation (1, 2, 5.5, 11 Mbps).
Setting legacy_rates='1' on OpenWrt’s wifi-iface fails to fix this: it only adds CCK rates to supported rates at specific cell densities, leaving mandatory basic rates OFDM-only.
The fix requires declaring explicit CCK rates directly on the radio PHY device (wireless.radio0):
# Mandatory rates for beacon/control frames
uci add_list wireless.radio0.basic_rate='1000'
uci add_list wireless.radio0.basic_rate='2000'
uci add_list wireless.radio0.basic_rate='5500'
uci add_list wireless.radio0.basic_rate='11000'

# Supported transmission rates
uci add_list wireless.radio0.supported_rates='1000'
uci add_list wireless.radio0.supported_rates='2000'
uci add_list wireless.radio0.supported_rates='5500'
uci add_list wireless.radio0.supported_rates='11000'
uci add_list wireless.radio0.supported_rates='6000'
uci add_list wireless.radio0.supported_rates='9000'
uci add_list wireless.radio0.supported_rates='12000'
uci add_list wireless.radio0.supported_rates='18000'
uci add_list wireless.radio0.supported_rates='24000'
uci add_list wireless.radio0.supported_rates='36000'
uci add_list wireless.radio0.supported_rates='48000'
uci add_list wireless.radio0.supported_rates='54000'

uci commit wireless && wifi reload
Note the syntax quirk: basic_rate is singular in UCI, while supported_rates is plural. Once hostapd advertises 1 Mbps CCK in basic_rates, vintage hardware sees the network instantly.
6. Flow Offloading vs. The Realities of Packet Processing
On a gigabit or multi-gigabit line, how you route packets across Linux netfilter matters. OpenWrt offers two distinct offloading modes in fw4:
- Software Flow Offloading (
flow_offloading='1'): Uses the kernel’snft_flow_offload/nf_flow_tablesubsystem. Once a bidirectional TCP or UDP stream completes its initial handshake and passes netfilter rules, subsequent packets bypass standard prerouting, forward, and postrouting chains. They hit an ingress flowtable hook directly on the network drivers (br-lan,br-private,br-wan) and get forwarded immediately. - Hardware Flow Offloading (
flow_offloading_hw='1'): Pushes flows directly into MediaTek’s Packet Processing Engine (PPE) on the MT7986A SoC, bypassing the Linux CPU entirely.
Hardware offloading sounds great on paper, but in practice on a heavily customized router, it can be a footgun. MediaTek PPE offloading bypasses the Linux network stack aggressively enough that, per community reports, software accounting (like vnstat polling interface counters), banip dynamic set checks, and traffic shapers (CAKE/SQM) can miss packets that never traverse the kernel path — I haven’t run flow_offloading_hw long enough myself to confirm this on my own setup, but it’s reason enough that I’ve stuck with software-only offloading.
The MT7986A quad-core A53 has massive processing headroom (18,000 DMIPs). Running pure software flow offloading (flow_offloading_hw='0') cuts context switching and CPU load to almost nothing during heavy multi-gigabit transfers while keeping netfilter visibility, interface byte accounting, and security filtering completely intact.
7. The Custom Firmware Upgrade Dilemma: AttendedSysupgrade (auc)
The biggest reason people stop maintaining heavily tuned OpenWrt setups is the friction of upgrades.
A stock sysupgrade preserves /etc/config/, but it wipes your overlay clean of any package that wasn’t built into the base squashfs rootfs. If your setup depends on a dozen third-party daemons and tools—banip, noisy, vnstat2, yggdrasil, alfis, meshnamed, Python libraries, and LuCI plugins—a kernel bump traditionally means a broken router followed by manually reinstalling every package by hand over SSH (or worse, if SSH itself didn’t survive the upgrade, over the serial console).
The solution is deploying AttendedSysupgrade (auc and luci-app-attendedsysupgrade):
opkg install auc luci-app-attendedsysupgradeWhen a new OpenWrt release drops, auc inspects your exact running system, extracts the manifest of every custom package installed, and queries the official OpenWrt ImageBuilder API. The remote builder compiles a custom, tailor-made sysupgrade .bin incorporating your exact running package set directly into the read-only SquashFS image.
You run auc from the terminal (or trigger it in LuCI), it downloads your custom-baked firmware image, validates checksums, and flashes it in place. You reboot directly into the new OpenWrt release with zero missing packages and all your configs intact.
8. The PWM Fan That Never Stopped Screaming
I installed a 3-pin PWM fan on the heatsink specifically because I planned to run this board hot — WireGuard, banip, multiple DNS daemons, a bunch of background processes. What I didn’t expect was that the fan would just… never throttle down. Ever. From the moment the board powers on, it’s pinned at 100% duty cycle, whether the CPU is at idle or under load.
This turned out to be a known, unresolved upstream bug: openwrt/openwrt#13772, open since October 2023 and still present in 24.10 as of writing. The root cause is in the devicetree:
- OpenWrt’s
pwm-fannode only defines a 3-levelcooling-levels = <255 96 0>array. BananaPi’s own vendor DTS defines 4 levels (<255 96 52 0>) — OpenWrt is missing the middle value. - More importantly, checking
cat /sys/class/thermal/thermal_zone0/cdev0_trip_pointshows the fan’s cooling device is bound to exactly one trip point (trip_point_2), which ships set to 32°C — well below this board’s idle CPU temp (45-51°C measured on mine). The kernel’sstep_wisethermal governor sees the temp permanently above that single trip, so it immediately latchescooling_device0at its maximum state on every boot and never lets go.
Bumping trip_point_2_temp higher doesn’t give you a real curve either — with only one trip point bound to the fan, you get binary on/off oscillation around whatever threshold you pick, not smooth steps. Multiple people in that GitHub thread confirmed the same failure mode across kernel 5.15 and 6.1, PWM-inverted vs non-inverted wiring, and both 2-pin and 3-pin fan headers — this isn’t specific to any one build.
The fix: bypass the kernel governor entirely
Since the devicetree-driven automatic control is broken, I wrote a small userspace daemon that takes over pwm1 in manual mode and drives it off a temperature curve directly:
#!/bin/sh
PWM_ENABLE=/sys/devices/platform/pwm-fan/hwmon/hwmon1/pwm1_enable
PWM_VAL=/sys/devices/platform/pwm-fan/hwmon/hwmon1/pwm1
TEMP_FILE=/sys/class/thermal/thermal_zone0/temp

echo 1 > "$PWM_ENABLE"   # manual mode — bypass the broken kernel governor

curve() {
	t="$1"
	if   [ "$t" -lt 50000 ]; then echo 0
	elif [ "$t" -lt 55000 ]; then echo 70
	elif [ "$t" -lt 60000 ]; then echo 110
	elif [ "$t" -lt 65000 ]; then echo 160
	elif [ "$t" -lt 70000 ]; then echo 200
	else echo 255
	fi
}

last_pwm=-1
while true; do
	temp=$(cat "$TEMP_FILE" 2>/dev/null)
	pwm=$(curve "$temp")
	[ "$pwm" != "$last_pwm" ] && { echo "$pwm" > "$PWM_VAL"; last_pwm="$pwm"; }
	sleep 5
done
Wrapped as a procd service (respawn 3600 5 0, enabled at boot), this took over immediately: pwm1_enable flips to 1 (manual), and the fan now idles quiet at pwm=0 below 50°C, only spinning up in steps as the CPU actually warms. Verified stable at 50-52°C holding a steady pwm=70 under light load — a real curve instead of permanent max speed.
This is a userspace workaround, not a kernel fix — the actual bug needs a devicetree patch upstream, and a community project (apavelm/banana-rpi3-fancontrol) exists doing something similar. If OpenWrt ever lands a real fix for the cooling-map, this daemon becomes redundant, but it won’t hurt anything running alongside a corrected kernel governor.
The Banana Pi BPI-R3 remains arguably the strongest bang-for-buck ARM router platform available if you appreciate having full control down to the raw device tree and nftables rulesets.